Author: CosmosGamer

  • The Diamond Casino & Resort, The Social Hub in GTA Online

    The Diamond Casino & Resort, The Social Hub in GTA Online

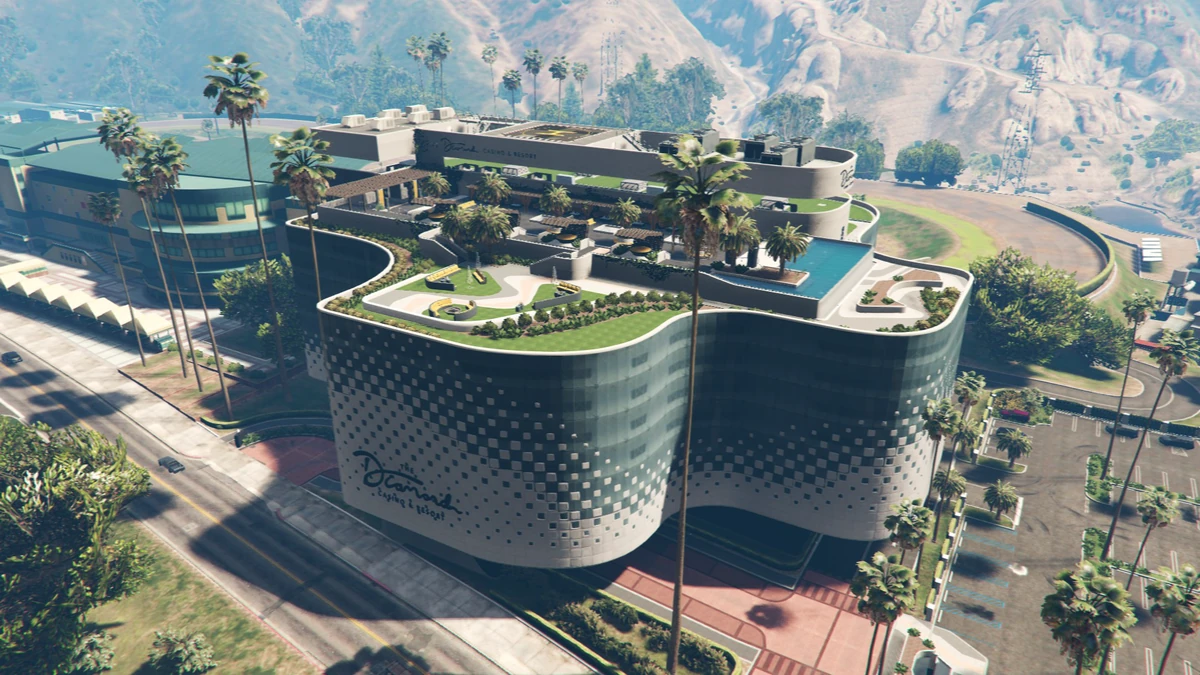
    If there’s one location that every GTA Online player has visited, lingered at, and secretly taken a screenshot of it’s The Diamond Casino & Resort. Sitting right on the corner of Vinewood Park Drive and Mirror Park Boulevard in East Vinewood, it’s been the undisputed social capital of Los Santos since it opened its doors.

    And years later, it still hits differently.

    What’s Actually Up There

    The rooftop of The Diamond is split into two areas that the community loves for completely different reasons.

    The Roof Terrace also called the “Roof Deck” is the public social space where anyone with a casino membership can hang out. There are three usable hot tubs running the length of the terrace, a mid-sized infinity pool on the west end, sunbathing lounges, a lower patio with group seating, and a raised firepit all with a full panoramic view of the Los Santos skyline stretching out beneath you.

    The Infinity Pool is the star of the show, and the community knows it. The outdoor roof terrace sports a luxurious infinity pool and views of the Los Santos city skyline and that combination is exactly why players keep coming back to stand here, park here, and just exist here in a city that rarely slows down.

    What Players Actually Love Most Here

    Here’s the honest truth about why The Diamond’s rooftop is still the #1 player hangout in 2026 it’s not the gambling, it’s the atmosphere.

    Players come here to flex, and the rooftop is the perfect stage for it. The community has turned the Casino entrance and rooftop into an unofficial fashion show players roll up in their most obscene supercars, step out in their most expensive outfits, and just own the space. It’s the one spot in GTA Online where showing off feels completely at home.

    The skyline view from the rooftop is genuinely one of the best in the game. There’s something about standing at the infinity pool edge at golden hour, watching Los Santos stretch out in every direction, that makes even the most chaos-hungry player pause for a second. It’s the kind of view that makes you forget there’s a wanted level system.

    The Master Penthouse For the Real VIPs

    If the public Roof Terrace is the community living room, the Master Penthouse is the private suite that every serious GTA Online player eventually works toward.

    The Casino Master Penthouse sits beside the Roof Terrace atop The Diamond Casino & Resort, and comes with an infinity pool and stunning views. It also entitles the owner to Casino VIP Membership status, which grants access to special services like complimentary Valet, Champagne, and Limousine Services, as well as Aircraft Concierge and access to High Limit tables and VIP Lounges.

    The penthouse isn’t just a property it’s a statement. You can customise the residence with several upgradeable floorplans including a private Spa with a round-the-clock personal stylist, a Bar and Party area perfect for hosting parties, a Media Room, and a Parking Garage for 10 cars. Starting at $1,500,000 in-game and scaling up to $6,533,500 fully loaded, it’s the aspirational endgame purchase that gives the Casino its social hierarchy.

    Why the Community Keeps Coming Back

    The Diamond works as a social hub because Rockstar built it specifically to be one. The Diamond Casino update offers a “social space” for players something Rockstar had explored in previous updates such as After Hours, which introduced in-game social activities like dancing and clubbing. The Casino took that concept and turned it into a permanent, fully realised destination.

    No other location in GTA Online combines luxury aesthetics, social activity, and a genuinely beautiful backdrop the way The Diamond does. The rooftop is the one place in Los Santos where griefers tend to holster their weapons, car enthusiasts line up their builds respectfully, and roleplay communities find a setting that actually matches their vibe. After all these years, that’s a rare thing and the community recognises it.

  • The “No-Lag” Visual Studio Guide (2026 Edition)

    The “No-Lag” Visual Studio Guide (2026 Edition)

    Let’s not sugarcoat it Visual Studio in 2026 is a genuinely heavy piece of software. While VS Code got leaner and meaner, full Visual Studio went the other direction: deeper AI integration, more background processes, and a memory footprint that can quietly balloon past 4GB on a large solution before you’ve written a single line. Reddit’s dev communities have been vocal about it all year.

    The difference between a fast Visual Studio and a sluggish one almost always comes down to what it’s doing when you’re not looking. Background indexing, real-time analysis across your entire solution, diagnostic tools running during every debug session it’s all happening silently. Here’s how to shut the right things down without losing what actually matters.

    1. Tackling Start-Up & Load Sluggishness

    The moment you open a large project, Visual Studio immediately tries to do too much at once. It reopens every document from your last session, loads every project in the solution, and starts indexing all simultaneously. That’s why the “Not Responding” window appears before you’ve clicked anything.

    Disable “Reopen Documents on Solution Load” immediately. Go to Tools → Options → Projects and Solutions → General and uncheck it. This stops VS from loading 20 code tabs at startup you reopen only what you actually need, and the solution loads dramatically faster.

    Solution Filters are the secret weapon for large enterprise repos. If your solution has 50 or 100 projects, you almost certainly don’t need all of them loaded at once. Create a .slnf filter file that loads only the projects relevant to your current task it’s a first-class Visual Studio feature that most developers never touch. Opening a filtered solution instead of the full one can cut load time in half on large codebases.

    Set your startup behaviour to “Empty Environment” for a clean cold start. Go to Tools → Options → Environment → Startup and remove the Start Window entirely. It’s a minor change, but removing that splash screen and auto-reload behaviour shaves real seconds off every launch and on a slow machine, those seconds add up across a workday.

    2. Managing Background Processes — The CPU Hog

    Background Analysis running across your entire solution is the most common cause of typing lag in Visual Studio. By default, VS scans and analyses every file in your solution in real time including the 50,000 lines of code in projects you haven’t opened in days. Go to Tools → Options → Text Editor → C# → Advanced and change Background Analysis scope from “Entire Solution” to “Open Documents”.

    Running Roslyn in a separate process keeps your UI thread responsive. Enable “Run code analysis in a separate process” under the same menu. This externalises the heavy analysis work so that when Roslyn is crunching through your codebase, the editor itself stays fluid and responsive rather than freezing mid-keystroke while it catches up.

    Disable Git Background Tasks if you use an external Git client. Visual Studio constantly polls the file system to track Git status branch names, changed files, ahead/behind counts even when you’re in the middle of debugging something unrelated. If you prefer using the terminal, Fork, or GitKraken, turn this off entirely under Tools → Options → Source Control → Git Global Settings. It’s one less background process competing for your CPU.

    3. Extension & Feature De-bloating

    The Extension Audit is the uncomfortable conversation most Visual Studio users avoid. Open Extensions → Manage Extensions and honestly ask: when did you last use Live Share? The Cloud Explorer? The legacy SQL tools that shipped with your Enterprise install? Disable anything you haven’t actively used in the past week each disabled extension is one fewer process loading at startup and sitting in memory.

    The Diagnostic Tools window runs by default during every debugging session and it is expensive. That CPU and memory profiler panel that appears automatically when you hit F5? It’s consuming significant RAM to record performance data you probably don’t need on every debug run. Go to Tools → Options → Debugging → General and uncheck “Enable Diagnostic Tools while debugging” re-enable it only when you actually need to profile something.


    IntelliCode has a real memory cost if you’re not actively using it. The AI-assisted completion engine runs background model inference to rank suggestions — which is impressive technology and a meaningful RAM overhead when you’re just trying to fix a bug. If you primarily use standard IntelliSense and don’t rely on AI completions, disabling IntelliCode under Extensions → Manage Extensions produces a noticeable reduction in background memory footprint.

    4. Editor Smoothness & Visual Performance

    CodeLens is one of the most visually expensive features in the editor and it’s on by default. Those “X references | Y authors | last modified” annotations that float above every method? They force the editor to constantly recalculate and re-shift text layout as you scroll and edit. Go to Tools → Options → Text Editor → All Languages → CodeLens and either disable it entirely or limit it to “Authors” only — the scrolling and editing experience becomes noticeably smoother immediately.

    The Navigation Bar at the top of the editor is a quiet layout cost. The class and method dropdowns at the top of every code file recalculate their position with every cursor move. Turn it off under Tools → Options → Text Editor → All Languages if you navigate primarily via Ctrl+T or Go to Definition — which you should be doing anyway.

    Hardware acceleration needs to be verified, not assumed. On multi-monitor setups or mixed-DPI displays, Visual Studio can silently fall back to software rendering. Check that “Optimize rendering for screens with different pixel densities” is enabled under Tools → Options → Environment → General. Getting this right eliminates the visual stuttering during scrolling that many developers spend months assuming is just “how VS is.”

    Visual Studio Performance Checklist

    The ProblemThe Specific Fix
    Typing lagSet Background Analysis to “Current Document”
    High memory usageDisable Diagnostic Tools during debugging
    UI stutter and jankDisable CodeLens and the Navigation Bar
    Slow debugging sessionsEnable “Just My Code”, disable Diagnostic Tools
    Slow solution loadUse Solution Filters (.slnf) for large repos
    Git polling overheadDisable Git Background Tasks if using external client
    AI memory bloatDisable IntelliCode if not actively using it
    Ghost background tasksAudit and disable unused extensions weekly

    Hardware & OS Level Fixes — The Ones Nobody Mentions

    Windows Defender is almost certainly scanning your project files on every build. Every .cs, .cpp, and .obj file that gets written during a build triggers a real-time antivirus scan on a large solution, this can add minutes to your build time invisibly. Add your entire project folder, your Visual Studio temp directory, and your NuGet cache to Windows Defender’s exclusion list under Windows Security → Virus & Threat Protection → Exclusions.

    Move your symbol cache and TEMP files to an NVMe drive. Visual Studio downloads and stores debug symbols for every library you reference on a slow HDD, loading those symbols during a debug session creates the familiar “attaching to process” delay. Set a custom symbol cache path on your fastest drive under Tools → Options → Debugging → Symbols, and your debug attach times will drop significantly.

    The single fastest change you can make right now? Go to Tools → Options → Text Editor → C# → Advanced, set Background Analysis to “Current Document”, and restart Visual Studio. Everything else on this list compounds on top of that one change but that one alone will make today’s session feel different from yesterday’s.

  • What to Look for When Building a PC for GTA V

    What to Look for When Building a PC for GTA V

    Building a PC specifically for GTA V is actually one of the more interesting hardware conversations in 2026 because you’re not building for one game, you’re building for two very different versions of the same game. GTA V Legacy and GTA V Enhanced have meaningfully different hardware appetites, and the components you prioritise depend entirely on which version you’re targeting.

    Here’s everything that actually matters, in the order it matters.

    The CPU GTA V’s Most Underrated Requirement

    GTA V is one of the most CPU-dependent open-world games ever made. The simulation running underneath Los Santos traffic AI, NPC behaviour, physics, mission scripting all runs on your processor, not your GPU. A weak CPU with a strong GPU will bottleneck hard in dense city areas, and no graphics setting fixes that.

    For GTA V Legacy, a quad-core processor at 3.2GHz or above is the comfortable entry point. The official recommended spec is an Intel Core i5-3470 or AMD FX-8350 anything at that level or above will handle the game’s CPU workload without becoming the limiting factor. If you’re building new, any modern Ryzen 5 or Intel Core i5 from the last four years will be significantly more than enough.

    GTA V Enhanced raises the bar substantially on the CPU side. Rockstar’s minimum for Enhanced is an Intel Core i7-4770 or AMD FX-9590 and those are genuinely minimum figures, not comfortable ones. For a smooth Enhanced experience, target at least a Ryzen 5 3600 or Intel Core i5-9600K, which sit at Rockstar’s recommended spec and handle the game’s heavier AI and streaming workloads without complaint.

    Core count matters less than clock speed for GTA V. The game scales well to four cores but doesn’t extract much benefit beyond that. A fast quad-core or six-core processor will outperform a slower eight-core chip in GTA V specifically so don’t overspend on core count when that budget could go toward faster RAM or a better GPU.

    The GPU Where Your Visual Experience Lives

    Your GPU determines how good the game looks, and GTA V is genuinely beautiful when given the headroom. For Legacy, the barrier to entry is low even a GTX 660 with 2GB VRAM runs it at the recommended spec. But for Enhanced, the floor jumps to a GTX 1630 or RX 6400 with 4GB VRAM at minimum, and the recommended spec is an RTX 3060 or RX 6600 XT with 8GB VRAM.

    VRAM is the number to watch most carefully. GTA V streams textures constantly as you move through the world, and running out of VRAM causes the game to pull from system RAM instead which produces the stuttering and pop-in that feels like a settings problem but is actually a hardware ceiling. For Legacy, 2GB VRAM is the floor. For Enhanced, 4GB is the floor and 8GB is the comfortable target.

    For a new build targeting Enhanced, the RTX 3060 or RX 6600 XT is the sweet spot in 2026. Both sit at Rockstar’s recommended spec, both have 8GB VRAM, and both are available at reasonable prices now that newer generations have pushed them down the market. You don’t need an RTX 4080 to run GTA V beautifully Rockstar’s recommended spec is genuinely achievable for a mid-range build.

    RAM More Than You’d Think

    8GB RAM is the floor for GTA V in 2026, and 16GB is where you want to be. Legacy’s minimum is 4GB, but running the game at that floor means Windows, the game, and every background process are all fighting for the same pool and the game loses. 8GB gives you comfortable headroom for Legacy. Enhanced recommends 16GB in dual-channel configuration, and that recommendation is worth following.

    Dual-channel matters for GTA V more than in most games. Running two matched sticks of RAM (2×8GB rather than 1×16GB) effectively doubles your memory bandwidth and because GTA V streams so much data simultaneously, that bandwidth has a real, measurable impact on frame consistency. Always buy RAM in pairs for a GTA V build.

    RAM speed has a meaningful effect on GTA V’s performance, particularly on AMD platforms. DDR4-3200 is the practical sweet spot fast enough to eliminate memory bandwidth as a bottleneck, widely available, and affordable. On a Ryzen build especially, don’t cheap out on RAM speed the performance difference between DDR4-2133 and DDR4-3200 on Ryzen is genuinely significant in open-world streaming scenarios like GTA V.

    Storage The One That Changes How the Game Feels

    GTA V Enhanced requires an SSD not recommends, requires. Rockstar’s minimum spec lists “105GB SSD Required” in plain terms. The game’s DirectStorage implementation and texture streaming pipeline are built around SSD speeds, and running it on an HDD will cause load failures and constant streaming stutter regardless of how good the rest of your build is.

    For Legacy, an HDD technically works but an SSD transforms the experience. Load times drop from 3–5 minutes to under a minute. Texture pop-in reduces dramatically. The transition between areas feels seamless rather than choppy. If you’re building a new PC for any version of GTA V, put it on an SSD even a budget SATA SSD is a massive upgrade over a spinning drive for this specific game.


    NVMe over SATA SSD is worth it if your budget allows. GTA V Enhanced’s recommended spec calls for a DirectStorage-compatible NVMe drive, which enables faster asset streaming at higher detail levels. A mid-range NVMe like a Samsung 870 EVO or WD Black SN770 is affordable in 2026 and covers this requirement comfortably. For Legacy, any SSD works but for Enhanced, target NVMe.


    The Complete Build Tiers

    Here’s how the components stack up across three realistic build targets:

    ComponentGTA V Legacy (Budget)GTA V Legacy (Comfortable)GTA V Enhanced (Recommended)
    CPUIntel i5-3470 / AMD FX-8350Intel i5-9400 / Ryzen 5 2600Intel i5-9600K / Ryzen 5 3600
    GPUGTX 1050 Ti (4GB VRAM)GTX 1660 (6GB VRAM)RTX 3060 / RX 6600 XT (8GB VRAM)
    RAM8GB DDR4 (single channel)8GB DDR4 (dual channel)16GB DDR4-3200 (dual channel)
    Storage256GB SATA SSD512GB SATA SSD512GB+ NVMe SSD
    PSU450W 80+ Bronze550W 80+ Bronze650W 80+ Gold
    OSWindows 10 64-bitWindows 10 64-bitWindows 10 (build 1909+) / Win 11

    The Components That Don’t Matter Much for GTA V

    Motherboard brand is irrelevant as long as it supports your CPU and RAM properly. GTA V doesn’t care whether you’re on a Z690 or a B450 what matters is that your RAM slots support dual-channel and your storage slots support the drive you’re installing. Don’t overspend on a motherboard for a GTA V build put that budget into GPU or RAM instead.

    A sound card is unnecessary. Rockstar’s requirement is “100% DirectX 10 compatible audio” which every motherboard’s onboard audio has met for the past decade. Skip the dedicated sound card entirely and spend that money elsewhere in the build.

    Cooling is important but not exotic. GTA V is a sustained workload it runs for hours, not minutes so a CPU cooler that can maintain temperatures under sustained load matters more than peak performance cooling. A mid-range tower cooler like the DeepCool AK400 or Cooler Master Hyper 212 handles any CPU you’d put in a GTA V build without breaking a sweat.

    One Thing Worth Knowing Before You Buy

    GTA V Enhanced and Legacy are separate downloads in 2026, but the same purchase. You don’t need to buy the game twice owning GTA V gives you access to both versions. But Enhanced requires the stronger hardware listed above, and there is no graphical upgrade path for the Legacy version it stays capped at its original visual fidelity regardless of how good your hardware is.

    If you’re building a new PC from scratch and your budget can reach the Enhanced recommended spec, build for Enhanced. If budget is tight and you’re choosing between a marginal Enhanced build and a comfortable Legacy build, the comfortable Legacy build will play better. A stable 60 FPS on Legacy beats a stuttering 30 FPS on Enhanced every time.

    Already on a low-end machine and not building new? Check out the full breakdown on how to squeeze the most out of what you have: Optimize GTA V Gameplay on a Low-End PC every graphics setting, every Windows tweak, and exactly what to turn off first.

  • The Second Galactic War: Helldivers 2 in 2026

    The Second Galactic War: Helldivers 2 in 2026

    Let’s get one thing straight Helldivers 2 in 2026 is not the same game you dropped into at launch. It’s messier, bigger, more controversial, and somehow still one of the most compelling live-service games on the planet. Democracy is complicated like that.

    Here’s your full briefing, Helldiver. Try to keep up.

    The Patch 6.2.2 Meta: “Machinery of Oppression”

    The Exosuit Renaissance is real and it’s glorious.

    The April 28 rebalance did something nobody expected it made Mechs actually good. Exosuit health jumped from 850 to 1600, and they now carry 50% explosion resistance. The “one-hit-break” era that made every Mech feel like a luxury cardboard box? Over.

    For the first time, running a Mech on a high-difficulty Automaton drop isn’t a flex move it’s a legitimate strategy. Veterans who shelved their Exosuits months ago are dusting them off and pretending they never lost faith.

    The SMG/FLAM-34 Stoker has quietly broken loadout logic.

    From the Entrenched Division Warbond, the Stoker’s underbarrel flamethrower did something elegant it freed up your Support Weapon slot entirely. You no longer have to choose between fire damage and your heavy weapon of choice. Loadout diversity in high-level play has genuinely expanded because of one gun. That doesn’t happen often.

    The May 6 Hive Guard hotfix was… a moment.

    Arrowhead accidentally swapped the armor values between Hive Guard legs and claws. As in the wrong body parts were tough. They caught it, admitted it, and reverted it. It’s funny, yes, but it also tells you something real: the devs are still moving fast. Sometimes too fast. But they’re moving.

    The Return of the Cyborgs & The “Star of Peace”

    The Cyborgs are back, and this time they came with homework.

    As of February 2026, the Cyborgs have officially returned and this isn’t just a palette swap enemy reskin. They’ve seized schematics for something called the “Star of Peace,” which sounds extremely ominous for something named after peace. The lore implications are still unfolding, and the community is absolutely here for it.

    The Illuminate speculation has reached critical mass.

    Over on r/Helldivers, the “vortex signals” detected on the galactic fringe have people convinced the third faction is months away not years. After two years of waiting, the mood has shifted from hopeful to certain. Whether that certainty is earned or just collective manifestation remains to be seen. Either way, the energy is electric.

    The “Engine Wall” & Community Sentiment

    Johan Pilestedt said the quiet part out loud.

    In a recent AMA, Arrowhead’s Creative Lead admitted the studio “underinvested” in the engine Autodesk Stingray. That single sentence explained a lot: the persistent War Table crashes, the FPS drops on new biomes like Terrek, the nagging sense that the game is being duct-taped to its own ambitions. At least they’re honest about it.

    “60-Day Promise” fatigue is real and growing.

    Players are tired of “we’re listening” posts that don’t translate into visible changes fast enough. The Unfiltered AMA revealed a community split: 700+ hour veterans who deeply love the game sitting right next to people who’ve crossed into full doomposting. The toxic positivity vs. criticism war on Reddit is at an all-time high. Both sides think they’re saving the game. It’s exhausting and kind of endearing.

    Level 150 players have nowhere to go.

    Veterans maxed out on Requisition Slips and Samples with nothing left to spend them on are quietly walking away. Not dramatically just drifting toward other games while waiting for a Prestige System that doesn’t exist yet. This is the “lifestyle gamer exodus,” and Arrowhead needs to address it before it becomes a trend instead of a complaint.

    Tactical Advice for Hell Dive (Diff 9/10)

    Mechs are strong except on bug missions.

    Here’s the catch with the Exosuit buff: acid damage now hits Mechs 50% harder. So while your mech shreds on Automaton drops, running one on Terminid missions is now actively riskier than before the patch. The buff giveth, the acid taketh away. Know your mission type before you call in that Stratagem.

    Stealth is the current high-level meta, and it works.

    With the P-33 Missile Pistol and Explosive Crossbow both sitting in a buffed state, experienced players are silently destroying fabricators from 100 metres away without triggering a single patrol. Solo map-clearing at Diff 9 is no longer a pipe dream it’s a build choice. If you’ve been playing loud all this time, consider going quiet. Your team will thank you.

    Why We Still Dive

    No other live-service game does what Helldivers 2 does with its Galactic War system. Every mission contributes to a community-wide narrative that actually moves. Planets fall. Factions push back. The story isn’t cutscenes it’s the matches you played last Tuesday.

    The engine has debt. The patches break things. Reddit is in a constant civil war. And yet the game still has something most titles never find: a sense that what you do actually matters.

    So are you capped on Samples already, or are you still grinding the Redacted Regiment?

  • The “No-Lag” Adobe Photoshop Guide (2026 Edition)

    The “No-Lag” Adobe Photoshop Guide (2026 Edition)

    Let’s be honest Photoshop in 2026 is a beast. Every AI feature Generative Fill, Content-Aware, neural filters it all ships with default settings tuned for a workstation, not your actual machine. photoshop and graphic_design communities have been screaming about this for two years straight, and they’re right.

    The good news is that most of the lag isn’t your hardware’s fault. It’s misconfigured settings, bloated scratch disks, and AI layers quietly recalculating in the background. Here’s how you fix all of it, in order.

    1. The Performance Preference Overhaul

    This is your first stop. Go to Edit → Preferences → Performance and prepare to undo everything Photoshop decided for you by default.

    Memory Usage, find your sweet spot. Photoshop defaults to a conservative memory allocation, but the real target is 70–85% of your available RAM. If you’re on 16GB, that means giving Photoshop roughly 11–13GB. The slider is right there drag it, and your canvas will thank you immediately.

    Graphics Processor settings need attention too. Enable Use OpenCL under Advanced Settings it offloads sharpening and blur filters to your GPU rather than your CPU, which is dramatically faster. If you’re on an older GPU or an M1/M2 Mac and experiencing crashes, toggling Legacy GPU Mode on is the Reddit-recommended fix that quietly solves a lot of “unexplainable” instability.

    History States is where most people leave performance on the table. The default is 50 states, which sounds useful until you realise Photoshop is storing every single undo step in RAM. Drop it to 20 you rarely need more than that, and the RAM you free up is significant on complex files.

    Cache Tile Size is the setting nobody explains properly. If you work with large, flat files and few layers (photography, composites), use Large Tiles they process big chunks faster. If you work with many layers, masks, and text (design, illustration), use Small Tiles they handle frequent, small changes more efficiently. Match your tile size to how you actually work.

    2. Scratch Disk Strategy

    Your scratch disk is Photoshop’s overflow when RAM fills up, everything spills here. If that overflow destination is slow, your whole workflow grinds. This is the number one cause of the mid-session freeze that feels like Photoshop is “thinking” when it should just be doing.

    Never use your OS boot drive as your primary scratch disk. Your C: drive is already handling Windows or macOS system processes, app data, and page file management. Stacking Photoshop’s overflow on top of that creates a bottleneck that no amount of RAM can fix.

    The external NVMe SSD trick is legitimately excellent. A dedicated NVMe drive connected via Thunderbolt 4 or USB4 gives you near-internal speeds as a scratch disk. Assign it in Preferences → Scratch Disks, move it to the top of the list, and you’ve essentially given Photoshop a high-speed overflow lane at a fraction of the cost of upgrading your internal storage.

    Keep at least 15–20% of your scratch disk free at all times. When a drive approaches capacity, read/write speeds drop sharply the “Your scratch disk is full” error is just the visible end of a problem that starts much earlier. Set a calendar reminder to clear your scratch disk monthly if you’re doing heavy work.

    3. Optimizing the Workflow The “UI Tax”

    Every visible element in Photoshop costs something. Rulers, guides, open panels, active artboards they all consume CPU cycles quietly in the background. None of them are expensive individually, but together they add up to a slower, heavier canvas experience.

    The “Hide to Speed Up” list is short and worth memorising. Turn off Rulers with Ctrl+R, hide Guides with Ctrl+;, and collapse or close any Artboard panels you’re not actively using. These are one-keystroke habits that collectively reduce canvas rendering load especially noticeable on lower-end machines or when zooming in and out of large files.

    Close the Learn and Libraries panels if you’re not using them. This one surprises people both panels actively ping Adobe’s servers to check for content updates, which eats bandwidth and CPU in the background. Right-click and close them. You can always reopen them when needed.

    Brush Smoothing is the most overlooked cause of brush lag. Photoshop defaults to some level of smoothing, which means every stroke is being calculated and corrected in real time. Set it to 0% for standard work it eliminates the slight delay between your stylus and the stroke, making the whole painting experience feel immediate and responsive again.

    4. Dealing with AI & New Features

    Generative Fill is the most resource-hungry feature in Photoshop right now. Every AI-generated layer retains its metadata so Photoshop can re-generate or adjust it later but if you’re done with the result, that’s just dead weight. Rasterize your Generative Fill layers once you’re satisfied: right-click the layer → Rasterize Layer. It converts the AI layer to a normal pixel layer and stops Photoshop from recalculating it every time you scroll or zoom.

    “Always Save to Cloud” has a real performance cost. Every time Photoshop auto-saves, if cloud sync is enabled, it’s uploading your file in the background and on large PSDs, that’s a significant background task. Switch to local saving in Creative Cloud preferences and manually sync when you’re done for the day. Your mid-work experience will be noticeably smoother.

    Content-Aware features can quietly slow down large libraries. If you have a large Creative Cloud Libraries collection, disabling background index searching stops Photoshop from querying your library assets while you work. Go to Libraries → Settings and turn off “Sync with Creative Cloud” temporarily during intensive sessions turn it back on when you’re done.

    5. File Handling & Background Tasks

    Disable PSD Compression and accept the trade-off. By default, Photoshop compresses PSDs to save disk space — but compression and decompression on every save and open is a real CPU cost. In Preferences → File Handling, uncheck “Maximize PSD and PSB File Compatibility.” Your files will be larger, but opening and saving will be noticeably faster, especially on SSDs where storage space is less of a concern than processing overhead.

    Auto-Save every 5 minutes sounds safe until you’re mid-stroke. The default 5-minute auto-save interval triggers a background write process that causes that familiar “freeze-stutter-resume” cycle. Change it to every 15 or 30 minutes in Preferences → File Handling. For extra safety, just hit Ctrl+S manually whenever you finish a major step it’s faster than waiting for auto-save anyway.

    Edit → Purge → All is the manual RAM reset you should be using regularly. During long sessions, Photoshop accumulates clipboard data, history states, and video cache that it doesn’t automatically release. Purging all of it mid-session clears that accumulated bloat without requiring a full app restart. Use it before starting a new document or switching to a significantly different task.

    6. Maintenance & Troubleshooting (The Nuclear Options)

    A corrupted preferences file causes more “unexplainable” lag than most people realise. Every major Photoshop update can leave preference conflicts that slow the app down in ways that don’t show up in any diagnostic. Hold Shift+Ctrl+Alt (Windows) or Shift+Cmd+Opt (Mac) at startup to reset preferences to factory state. It feels drastic, but it’s the single most effective fix for post-update performance degradation.

    NVIDIA users should be on Studio Drivers, not Game Ready Drivers. Game Ready Drivers are optimised for frame rates and gaming workloads they can introduce instability in creative applications. Studio Drivers are specifically validated for Adobe software, and the difference in Photoshop stability (especially with GPU-accelerated features) is real and documented across Reddit threads.

    Sometimes the right answer is rolling back a version. Adobe’s Creative Cloud app lets you install previous versions of Photoshop under the “Other Versions” option. If a recent update introduced lag you can’t fix through settings, rolling back one version is a legitimate and underused option. You’re not stuck with the current build.

    One Peer Tip Worth Taking Seriously

    If you’re regularly working with 100+ layers or large print files, the Reddit consensus in 2026 is increasingly pointing at Affinity Photo or InDesign as the speed-practical choice for those specific workflows. Photoshop is a resource glutton by design it’s built to do everything, which means it always carries overhead for the things you’re not using.

    Knowing when to use the right tool for the task is itself an optimisation. Use Photoshop for what it does best, and don’t be afraid to route specific workflows through lighter alternatives. Your RAM will thank you.
  • Optimize GTA V Gameplay on a 4GB RAM PC

    Optimize GTA V Gameplay on a 4GB RAM PC

    So you’ve got a low-end PC and you want to run GTA V. Respect. You’re not alone millions of players are still grinding Los Santos on machines that would make a modern GPU cry. The good news? GTA V Legacy was literally built with you in mind. The bad news? It still needs some convincing.

    Let’s fix that, step by step.

    First, Know Which Version You’re Running

    Before touching a single setting, get this straight there are two versions of GTA V right now, and only one of them works on your machine.

    GTA V EnhancedGTA V Legacy
    Minimum RAM8GB4GB
    Minimum GPU VRAM4GB1GB
    Minimum CPUIntel i7-4770 / AMD FX-9590Intel Q6600 / AMD Phenom 9850
    Storage105GB SSD (required)125GB HDD
    Your 4GB PC❌ Not supported✅ Playable with tweaks

    If you’re on 4GB RAM, you’re on GTA V Legacy. Full stop. Don’t even attempt Enhanced — it’ll either crash immediately or make your PC sound like a jet engine trying to take off from your desk.

    What Your PC Is Actually Dealing With

    Let’s get honest about what’s happening under the hood. Here are three real-world situations for low-end machines:

    Situation A The Budget Laptop (Struggling)

    • CPU: Intel Core i3-6006U (2 cores, 2GHz)
    • RAM: 4GB DDR3
    • GPU: Intel HD Graphics 520 (integrated, shared VRAM)
    • Storage: 500GB HDD

    What happens in-game: GTA V loads, stutters badly in traffic, drops to 15–20 FPS in dense areas like downtown, and hits the RAM ceiling within 20 minutes. The city basically becomes a slideshow during police chases. The HDD also means 3–4 minute load times every session.

    Situation B The Old Desktop (Borderline Playable)

    • CPU: Intel Core i5-2400 (4 cores, 3.1GHz)
    • RAM: 4GB DDR3
    • GPU: NVIDIA GT 730 (2GB VRAM)
    • Storage: 500GB HDD

    What happens in-game: Stable 25–35 FPS on the right settings, with occasional stuttering during cutscenes and large open areas. This machine sits right on the edge of comfortable if you tune it properly. This guide is built for you.

    Situation C The Slightly Better Low-End (Optimizable)

    • CPU: AMD Ryzen 3 3200G with Radeon Vega 8 (integrated)
    • RAM: 4GB DDR4
    • GPU: Integrated Radeon Vega 8 (shares system RAM)
    • Storage: 256GB SSD

    What happens in-game: Better than it looks on paper, but the integrated GPU eating into your already-tight 4GB RAM is the real enemy here. Framerates hover around 20–30 FPS. The SSD saves you on load times at least.

    Step 1 Free Up RAM Before You Even Launch the Game

    This is the most impactful thing you can do and it costs nothing.

    Close everything that’s eating memory:

    • Discord (uses 200–400MB on its own)
    • Chrome or any browser
    • Background apps like Spotify, OneDrive, Steam overlay if possible
    • Windows Search indexing (can be paused temporarily)

    How to check what’s running:

    1. Press Ctrl + Shift + Esc to open Task Manager
    2. Click the Memory column to sort by usage
    3. Kill anything above 50MB that you don’t need

    Target: get your idle RAM usage below 1.5GB before launching GTA V. That gives the game at least 2.5GB to breathe.

    Step 2 Set Your Graphics Settings (The Exact Numbers)

    Open GTA V, go to Settings → Graphics. Here’s exactly what to set:

    Graphics Settings Table for 4GB RAM

    SettingRecommended ValueWhy
    DirectX VersionDirectX 10.1 or 11DX10.1 uses less VRAM
    Screen Resolution1280×720 (720p)Big FPS gain over 1080p
    Aspect RatioAutoLeave it
    Refresh RateMatch your monitorLeave it
    Texture QualityNormalHigh eats VRAM fast
    Shader QualityNormalDrop to Low if needed
    Shadow QualityNormal → LowShadows are RAM killers
    Reflection QualityLowMinimal visual loss
    Reflection MSAAOffTurn this off completely
    Water QualityHighCheap to render, looks good
    Particles QualityHighLow GPU cost
    Grass QualityLow or OffSurprisingly expensive
    Soft ShadowsSofter or PCSS offPCSS tanks performance
    Post FXNormalDrop to Low if stuttering
    Motion BlurOffUseless on low FPS anyway
    Depth of FieldOffFrees up GPU
    Anisotropic FilteringX4Balance of quality/cost
    Ambient OcclusionOffBig performance cost
    TessellationOffNot worth it here
    Long ShadowsOffOff completely
    High Resolution ShadowsOffOff completely
    High Detail StreamingOffCritical — turn this off
    Extended Distance ScalingFar left (minimum)Fewer objects loaded
    Extended Shadows DistanceFar left (minimum)Less shadow rendering

    VRAM Usage bar: Keep an eye on the VRAM bar at the bottom of the graphics screen. Keep it in the yellow, never red. If it hits red, your GPU starts pulling from system RAM and everything stutters.

    Step 3 In-Game Additional Settings

    Go to Settings → Advanced Graphics:

    • Frame Scaling Mode: Off
    • Long Shadows: Off
    • High Resolution Shadows: Off
    • High Detail Streaming While Flying: Off ← this one matters a lot

    Go to Settings → Display:

    • Pause Game on Focus Loss: On (stops the game running in background)
    • VSync: Off (frees up frames, add frame limiter instead)

    Step 4 Add a Frame Rate Cap

    No VSync, but uncapped FPS causes stutter too. Use RTSS (RivaTuner Statistics Server) free download and cap your FPS to 30.

    Sounds low. But a locked, smooth 30 FPS feels dramatically better than a game swinging between 45 and 12 FPS every few seconds. Consistency beats peaks on low-end hardware every time.

    Step 5 Fix Windows for Gaming

    This is the stuff nobody talks about but makes a real difference.

    Set GTA V to High Priority:

    1. Launch the game
    2. Alt+Tab to Task Manager
    3. Find GTA5.exe → Right-click → Set Priority → High

    Enable Game Mode:

    1. Press Windows + I → Gaming → Game Mode → On
    2. This stops Windows Update and background processes from interrupting gameplay

    Disable Xbox Game Bar:
    Settings → Gaming → Xbox Game Bar → Off. It uses RAM and you don’t need it.

    Set Power Plan to High Performance:
    Control Panel → Power Options → High Performance. Your laptop will run warmer, but your CPU won’t throttle mid-chase.

    Step 6 — Use the Right Launch Options

    Right-click GTA V in your Rockstar Games Launcher or Steam → Properties → Launch Options. Add this:

    -memrestrict 3221225472 -norestrictions -noBlockOnLostFocus

    What this does:

    • -memrestrict tells the game to limit itself to roughly 3GB RAM usage (leaving your OS room to breathe)
    • -norestrictions disables Rockstar’s internal memory restrictions that can cause odd stutters
    • -noBlockOnLostFocus prevents the game from pausing randomly when you alt-tab

    The Quick-Answer Section

    Best graphics settings for a very low-end laptop?

    Drop to 720p immediately. Turn Shadows to Low, Grass to Off, Ambient Occlusion Off, all Distance Scaling sliders to minimum. Keep Texture Quality at Normal going below Normal actually hurts because the game streams textures constantly anyway. You’re aiming to stay below 1.5GB VRAM usage at all times.

    Low RAM stuttering — what can I do?

    Stuttering on 4GB RAM is almost always a memory paging issue the game is spilling over into your page file (virtual memory on your HDD/SSD), and that causes the hard freezes you feel every 30–90 seconds. Fix it:

    1. Close background apps (get below 1.5GB idle RAM)
    2. Increase your Page File: System → Advanced → Performance Settings → Virtual Memory → set minimum 4096MB, maximum 8192MB
    3. Turn High Detail Streaming While Flying off — this is the biggest single cause of sudden RAM spikes
    4. Turn Extended Distance Scaling to minimum

    Some optimisation recommendations for GTA V on a low-end PC?

    Here’s the priority order, from highest to lowest impact:

    1. Drop to 720p resolution
    2. Turn off High Detail Streaming While Flying
    3. Set Shadows to Low
    4. Turn Grass Quality to Low/Off
    5. Turn off Ambient Occlusion
    6. Close all background apps before launching
    7. Cap framerate to 30 FPS with RTSS
    8. Set Power Plan to High Performance
    9. Increase Page File size
    10. Set game process priority to High

    One Last Thing

    You’re not going to get 60 FPS on a 4GB RAM machine in GTA V. Anyone telling you otherwise is selling something. What you can get is a stable, playable 25–35 FPS that doesn’t stutter every block, doesn’t crash in the middle of a mission, and actually lets you enjoy the game.

    That’s the goal. And with the steps above, it’s genuinely achievable.

    Good luck out there, and watch the VRAM bar.

  • How to Make Chrome Fast on 4GB RAM in 2026

    How to Make Chrome Fast on 4GB RAM in 2026

    If you’re running Chrome on 4GB RAM in 2026, you already know the pain. You open three tabs, your system fan starts screaming, and Google Maps turns your browser into a very expensive paperweight. Chrome’s everyday bloat has reached a genuine tipping point.

    The frustrating part? Most of the lag is fixable without upgrading your hardware. Chrome’s default settings are tuned for machines with 16GB of RAM and fast SSDs. On a 4GB system, those defaults are actively working against you. Here’s how to change that.

    First Understand What’s Actually Happening on Your Machine

    Before touching a setting, open Chrome’s built-in Task Manager with Shift + Esc. You’ll immediately see something surprising Chrome isn’t one process, it’s dozens. Every tab, every extension, and every background service runs as a separate process, each with its own memory allocation. On 4GB RAM, this architecture is brutal.

    The GoogleUpdater.exe problem is real and it’s the first thing you’ll notice. Opening Chrome in 2026 can trigger 7–8 simultaneous instances of GoogleUpdater in the background, causing CPU spikes up to 70% for the first few minutes of every session before you’ve even loaded a page. This isn’t a virus, it’s Chrome doing maintenance at the worst possible time.

    “Zombie processes” are the invisible RAM drain nobody warns you about. When you close a tab, Chrome doesn’t always release the memory that tab was using. The process lingers in the background, consuming gigabytes of RAM long after you’ve moved on. On a 4GB system, two or three zombie processes can silently eat half your available memory and the system has no obvious way to tell you this is happening.

    Here’s what that looks like on a real 4GB machine:

    ProcessTypical RAM UsageNotes
    Chrome Browser (base)300–500MBBefore any tabs open
    Each open tab100–400MBHeavy sites like Maps = 400MB+
    Each active extension50–200MBScript-heavy adblockers hit 200MB
    GoogleUpdater.exe (×7)50–150MB totalSpikes CPU on launch
    Zombie tab processes100–500MB eachInvisible, don’t close automatically
    Windows 10/11 idle1.5–2.5GBBefore Chrome opens at all

    Total realistic RAM usage before you’ve done anything useful: 2.5–3.5GB on a 4GB machine. That’s the problem in a table.

    Step 1 Kill the Startup CPU Spike

    The first fix is stopping GoogleUpdater from running wild at launch. Open Task Manager (Ctrl + Shift + Esc), go to the Startup tab, and disable any Google Update entries listed there. Then navigate to C:\Program Files (x86)\Google\Update and rename GoogleUpdate.exe to GoogleUpdate.exe.bak — this prevents the updater from auto-launching without uninstalling Chrome entirely.

    Chrome will still update just on its own schedule instead of every single launch. You can manually trigger updates by going to chrome://settings/help whenever you want to check. This one change alone can eliminate the 2–3 minute CPU freeze that makes Chrome feel broken every time you open it on a low-end machine.

    Disable unnecessary startup background processes inside Chrome itself. Go to chrome://settings/system and turn off “Continue running background apps when Chrome is closed.” On a 4GB machine, Chrome running silently in the background while you’re doing other things is not a feature — it’s a resource thief. Turn it off completely.

    Step 2 Enable Memory Saver and Configure It Properly

    Memory Saver Mode is the single most important Chrome setting for 4GB RAM users and it’s off by default. Go to chrome://settings/performance and toggle Memory Saver to On. This puts inactive tabs to sleep — they stop consuming RAM and CPU until you click back on them, at which point they reload.

    The difference on a 4GB machine is dramatic. With Memory Saver on, an open tab that you haven’t touched in five minutes drops from 200–400MB of active RAM usage to near zero. With 10 tabs open, that’s potentially 2–3GB of RAM returned to your system. Set it to “Maximum savings” mode if the option is available, the slight reload delay when switching tabs is absolutely worth it at this RAM level.

    Add your most-used sites to the “Never sleep” exceptions list. If you keep Gmail or your work dashboard open constantly and hate the reload delay, go to Memory Saver settings and whitelist those specific sites. Everything else gets put to sleep only your actively-needed tabs stay warm. This is the balance that makes Memory Saver actually usable rather than just annoying.

    Step 3 Deal with the Extension Problem

    A single heavy extension can cause more lag than five extra open tabs. Reddit threads in 2026 have specifically called out Bitwarden and script-heavy adblockers as causing minutes-long startup lag on lower-end machines not because they’re badly made, but because they run persistent background scripts that Chrome can’t efficiently manage alongside everything else.

    The fix isn’t to disable extensions it’s to audit them the same way you’d audit startup programs. Go to chrome://extensions and look honestly at what’s there. Anything you haven’t actively used in the past two weeks should be removed entirely, not just toggled off disabled extensions still load their service workers at startup on some Chrome versions. Removal is the only clean cut.

    For password managers and adblockers specifically, reinstall rather than toggle if you’re experiencing lag. The current community-verified fix for extension conflict loops where one extension causes the browser to freeze on startup is a clean reinstall of the problematic extension rather than a disable/enable cycle. Corrupted extension data doesn’t clear on disable, but it does clear on uninstall. If Chrome is slow specifically at launch, this is worth trying before anything more drastic.

    Keep your active extension count to five or fewer on a 4GB machine. That’s not a preference it’s a practical RAM budget decision. Use Shift + Esc to open Chrome Task Manager and check exactly how much RAM each extension is consuming. Anything above 100MB that you don’t use daily is a candidate for removal.

    Step 4 Fix Hardware Acceleration (The Google Maps Problem)

    Typing lag and browser freezing on Google Maps is almost always a Hardware Acceleration conflict. The latest Chromium builds have a known issue where Hardware Acceleration conflicts with newer GPU drivers particularly on integrated graphics, which is what most 4GB RAM machines are running. The result is input lag where letters appear seconds after keystrokes, stuttering video, and occasionally a full browser crash.

    Try disabling Hardware Acceleration first and see if the problem disappears. Go to chrome://settings/system and toggle “Use hardware acceleration when available” to Off, then relaunch Chrome. If Google Maps suddenly works properly and the typing lag is gone, you’ve found your culprit. On integrated graphics with limited VRAM, software rendering is sometimes genuinely faster than a conflicted hardware acceleration path.

    If you need Hardware Acceleration for video smoothness, update your GPU driver before re-enabling it. On Intel integrated graphics, go to Intel’s driver support site and grab the latest DCH driver. On AMD integrated (Ryzen APUs), use AMD’s auto-detect tool. An outdated driver combined with Chrome’s latest Chromium build is the most common cause of the acceleration conflict the fix is usually a driver update, not a permanent setting change.

    Step 5 The Profile Reset (When Nothing Else Works)

    If Chrome still lags after all of the above, the issue is almost certainly a corrupted profile cache. This is the fix that Reddit threads keep returning to in 2026 and the important distinction is that “Reset Chrome” in settings does not actually fix this. A settings reset leaves your profile data, extensions, and cached files intact. The corrupted data stays.

    Create a completely new Chrome profile instead. Click your profile picture in the top right → Add → Create new profile. Sign in fresh on the new profile and reinstall only the extensions you actually need. In most reported cases, the new profile runs dramatically faster because you’re not carrying months of accumulated corrupted cache data that the standard reset ignores.

    As a last resort before switching browsers, clear Chrome’s profile data manually from the file system. Close Chrome completely, navigate to C:\Users\[YourName]\AppData\Local\Google\Chrome\User Data\Default, and delete the Cache, Code Cache, and GPUCache folders. These rebuild automatically on next launch and are safe to delete they’re just stored website data, not your passwords or bookmarks.

    The 4GB RAM Reality Check Table

    SituationRAM UsedWhat Happens
    Chrome open, 1 tab, no extensions~1.8GB totalWorkable but tight
    Chrome + 5 tabs + 3 extensions~3.2GB totalSystem starts swapping to disk
    Chrome + 10 tabs + Google Maps~3.8–4.2GB totalExceeds RAM, heavy stuttering
    Chrome + Memory Saver ON + 3 extensions~2.4GB totalNoticeably smoother
    Chrome + Memory Saver + 5 tabs sleeping~2.0GB totalBest realistic configuration

    Alternative Browsers Worth Considering

    If Chrome remains unusable after all of the above, the community has two strong recommendations for 4GB RAM machines. Brave which is Chromium-based, so all your extensions work consistently reports 20–30% lower RAM usage than Chrome with its built-in ad blocking handling what extensions would otherwise handle. Microsoft Edge has the best “sleeping tab” implementation of any major browser, and on Windows it integrates with the OS in ways that make it genuinely more efficient on lower-end hardware.

    Switching browsers isn’t giving up it’s using the right tool for your hardware. Chrome is excellent on 16GB RAM. On 4GB, Brave or Edge will give you a meaningfully better daily experience for the same browsing tasks, and both sync with your Google account so the transition is painless.

  • GTA 6: 5 Innovations That Will Change How You Play

    GTA 6: 5 Innovations That Will Change How You Play

    Release date discourse is fun and all, but let’s talk about the actual game. Because if even half of what’s been reported is true, GTA 6 isn’t just a bigger GTA 5 it’s a fundamentally different way of playing. Here’s what’s actually changing.

    1. The “Living World” Logic

    The crowd technology in GTA 6 is doing something new.

    GTA 5 could push roughly 15–20 NPCs on screen at a time. The Vice Beach sequences in the trailers suggest we’re looking at potentially hundreds simultaneously each with distinct behavior loops. NPCs filming incidents on their phones, taking selfies near chaos you just caused, reacting to what you’re wearing. The world doesn’t just exist around you anymore. It notices you.

    This isn’t cosmetic. When a crowd has social media behaviors baked into its AI, your actions have an audience within the fiction. That changes how crime feels and how the world responds to it.

    700+ enterable interiors might be the quietest revolution in the game.

    In previous GTA titles, about 90% of buildings are glorified wall textures. Reports around GTA 6 point to a massive shift malls, skyscrapers with functional lifts, seedy motels you can actually check into. When a city has real depth behind its facades, it stops feeling like a movie set and starts feeling like a place. That’s the difference between a sandbox and a world.

    2. The Jason & Lucia Trust System

    This isn’t just “press left on the D-pad to swap characters.”

    The dual protagonist system in GTA 6 reportedly goes beyond switching. During free-roam, your AI partner actively supports you in real time covering angles during a shop robbery, repositioning without a scripted trigger, making decisions. It’s the difference between a co-op mechanic and a relationship mechanic. Your partner behaves like someone who’s invested.

    The loyalty system could define your ending.

    Rumours point to a mechanic similar to RDR2’s honour system except applied to the relationship between Jason and Lucia. The choices you make as either character may shift a “loyalty bar” that determines whether you get a ride-or-die ending or a betrayal ending. If true, this turns every morally grey decision in the game into something with emotional weight rather than just narrative flavour.

    3. The Leonida Map It’s Not Just Big

    Six distinct biomes, and size is the least interesting thing about them.

    The map is estimated at roughly 2.5 to 3.5 times the size of Los Santos. But raw scale is the wrong metric. What matters is density how much is actually happening per square mile. Here’s the breakdown:

    Vice City the neon-soaked urban core. Everything loud and bright and dangerous that you’d expect, cranked up.

    Grassrivers the swampy Everglades equivalent. Gator territory. Low-riding cars will struggle here, which means vehicle choice suddenly has environmental stakes.

    The Leonida Keys an archipelago designed for exactly the kind of high-speed boat chases and underwater diving that GTA 5 only teased. Water gameplay finally has geography to match it.

    Mount Kalaga a national park biome for off-road vehicles and, presumably, the kind of missions that have you hiking somewhere you absolutely shouldn’t be.

    Each biome isn’t just a visual skin it creates different gameplay constraints. That’s good map design.

    4. Tactical Gameplay: Weight & Gear

    Trunk storage is the most “this isn’t GTA anymore” change in the game.

    You can no longer carry a rocket launcher, three assault rifles, and a minigun in your jacket pocket. Heavy weapons live in your vehicle’s trunk now, borrowing directly from RDR2’s approach. Before you step out of the car, you’re making loadout decisions. Do you bring the heavy artillery for what might happen, or travel light for what’s likely? That’s a new kind of thinking for a GTA game.

    It sounds like a restriction. It plays like depth.

    Prone movement and body dragging shift the whole combat register.

    Leaked mechanics suggest a prone system and the ability to crawl or drag bodies. If accurate, this moves GTA 6 away from its arcade run-and-gun roots into something more tactical and deliberate. Clearing a building quietly becomes a viable option rather than an afterthought. The game stops rewarding chaos as the only strategy.

    5. The “Connected” Universe

    The in-game social media isn’t just set dressing.

    The TikTok-style clips in the trailers aren’t cutscenes they appear to be part of a functioning in-game internet where your crimes can go viral in real time within the game world. More interestingly, reports suggest this same system will be how certain missions are discovered. You’re not just reading a map marker — you’re stumbling onto a viral video and deciding whether to get involved. That’s mission design through the world’s own logic.

    The Bonnie & Clyde structure works because it’s personal.

    A duo outperforms a trio narratively for one simple reason every heist, every decision, every betrayal means something because there are only two people it can fall on. GTA 5’s three-protagonist structure was impressive engineering. Jason and Lucia’s dynamic is something tighter: two people making impossible choices together, where the emotional fallout lands directly on you as the player. That’s the kind of story that sticks.

    We know November 19 is the date. Now you know what’s actually waiting on the other side of it.

    The map isn’t just big it’s built differently. The characters aren’t just switchable they’re connected to you. And the world isn’t just populated it’s watching.

  • GTA 6 in May 2026: Everything Changing Right Now

    GTA 6 in May 2026: Everything Changing Right Now

    Let’s be real the GTA 6 hype has crossed some kind of event horizon.

    We’re well past “excited” and deep into that special zone where people are refreshing Reddit at 2am and treating every corporate earnings call like a papal announcement.

    So here’s everything you need to know right now, minus the copium. Well mostly.

    The Current State of Play

    Let’s start with the cold, hard facts before we spiral into speculation territory.

    Official release datePlatformsThe judgment date
    November 19, 2026
    A Thursday. Bold choice, Rockstar.
    PS5 & Xbox Series X/S
    PC? Check back in 2027–28.
    May 21, 2026
    Take-Two earnings call. The real announcement.

    The date that actually matters right now is May 21. That’s Take-Two Interactive’s earnings call where investors get the unfiltered truth about whether November is locked in or whether we’re quietly boarding the 2027 train.

    This isn’t just a formality. Executives don’t get to be vague on earnings calls the way they can be with fans. If the date is slipping, we’ll know.

    Reddit Pulse: What Fans Are Obsessing Over

    r/GTA6 temperature check

    The Trailer 3 Countdown

    The consensus on r/GTA6 is that a third trailer or at minimum a gameplay teaser will drop before May 21 to juice investor confidence. Rockstar knows what it’s doing; a well-timed video right before an earnings call is basically a mic drop in shareholder language.

    The 30 FPS vs. 60 FPS War

    This debate is nuclear. A surprising number of “normal” users are actually coming to peace with 30 FPS — if it means the Leonida visuals stay intact and stunning. Others are treating 60 FPS as a non-negotiable human right. Neither side is backing down. Bring popcorn.

    The Yanis Community Map V11

    Fan cartographers on Reddit have assembled “Yanis Community Map V11” — a stitched-together leak-sourced visualization of Vice City and the surrounding state of Leonida. It’s enormous. Like, “I need a minute to process this” enormous. And it’s entirely community-built.

    Leaked Gameplay Features (The Fun Stuff)

    Take these with the appropriate grain of salt but they’re too interesting not to talk about.

    Jason & Lucia’s Relationship Bar Reports – suggest your choices throughout the game will affect the dynamic between the two protagonists, potentially shaping the ending. Think Mass Effect, but with more car chases and fewer blue aliens.

    The Greet & Antagonize System is Back – The beloved interaction mechanic from Red Dead Redemption 2 is reportedly returning. This means the world isn’t just a backdrop NPCs will actually react to you like you’re a person, not a physics object with a wanted level.

    Smarter Police AI – The days of cops materializing out of desert sand are apparently over. Expect stealth mechanics and tactical police responses that actually make sense geographically. Revolutionary, honestly.

    Normal-User Reality Check

    Cutting through the noise on the questions everyone’s actually asking.

    Should I buy a PS5 or Xbox now?

    Yes. The game is confirmed current-gen only. There’s no PC date, no last-gen port, no streaming workaround. If you want to play GTA 6 at launch, you need the hardware. Simple as that.

    Is the PC version actually happening?

    Almost certainly yes but not at launch. Rockstar’s history is clear: GTA V hit PC about 18 months after consoles. RDR2 took even longer. Expect PC sometime in 2027 or 2028. It’ll look incredible. You’ll just have to wait.

    Will it cost $150?

    Probably not. Take-Two CEO Strauss Zelnick has been coy about “value-based pricing,” which is executive-speak for “we’re thinking about it.” But the realistic industry expectation is $70–$80 for the base game. The $150 number is viral anxiety, not a price sheet.

    “I think a lot of people will be calling in sick on November 19.”
    — Strauss Zelnick, CEO of Take-Two Interactive

    When your own CEO is endorsing mass absenteeism, you know the confidence is real. November 19 is the date. May 21 is when we find out for sure. Until then stay hydrated, touch grass occasionally, and maybe keep an eye on that r/GTA6 front page.

  • The “No-Lag” VS Code Guide (2026 Edition)

    The “No-Lag” VS Code Guide (2026 Edition)

    VS Code in 2026 is quietly becoming what it once made fun of a heavy, memory-hungry editor that slows down the longer you use it. Between GitHub Copilot pinging models in the background, GitLens indexing your entire commit history, and Electron doing what Electron does, what was once a “lightweight” editor now regularly tips past 1GB of RAM before you’ve even opened a file.

    The good news is that almost all of it is fixable through your settings.json. Reddit’s developer communities have been documenting these fixes all through 2025 and 2026, and the consensus is clear the defaults are set for showcasing features, not for performance. Here’s how to take it back, in order.

    1. Trimming the Bloat The Anti-Lag Strategy

    Inline Suggestions is the single biggest cause of typing lag in 2026. Every keystroke triggers a background call either to a local model or a remote one and that constant pinging adds latency between your fingers and the screen. Open your settings.json and set "editor.inlineSuggest.enabled": false. You can still trigger suggestions manually with Ctrl+Space when you actually want them.

    The 5-Extension Rule is the audit you’ve been putting off. Open the Extensions panel, sort by install count, and ask honestly: how many of these run all the time, not just when you call them? GitLens, Pylance, and ESLint all perform CPU-heavy “Code Actions on Save” if you’re saving frequently (which you should be), these are firing constantly. Audit down to five truly essential extensions and disable the rest globally.

    Workspace-specific extension management is the habit that changes everything. Instead of running all your Python tooling globally, disable extensions at the global level and only enable them per workspace. Your Markdown project doesn’t need Pylance. Your HTML project doesn’t need a Rust analyzer. Go to any extension → right-click → “Disable (Workspace)” to start working this way immediately.

    Clearing VS Code’s cache resets performance that degrades over weeks. After months of use, the global storage and workspace storage folders accumulate stale data that quietly slows the app. Close VS Code, navigate to %APPDATA%\Code on Windows or ~/.config/Code on Linux/Mac, and delete the contents of User/workspaceStorage it rebuilds cleanly on next launch and the difference is often immediately noticeable.

    2. UI & Visual Performance Optimization

    The VS Code UI runs inside Electron, which means every visual element has a GPU and RAM cost. The minimap, indent guides, whitespace rendering, and bracket decorators are all being redrawn constantly as you type and scroll. Stripping the ones you don’t actively use is the fastest way to reduce the editor’s visual overhead without touching functionality.

    Add these to your settings.json and feel the difference:

    "editor.minimap.enabled": false,
    "editor.guides.indentation": false,
    "editor.renderWhitespace": "none"

    The minimap alone is one of the more expensive UI elements it re-renders a pixel-level view of your entire file on every change. Most developers never actually use it for navigation. Turning it off is a clean win.

    Hardware acceleration is worth verifying not just assuming it’s on. VS Code uses GPU acceleration through Electron, but on some systems (particularly those with older integrated GPUs or certain Linux drivers), it can silently fall back to software rendering, which tanks performance. Open the Command Palette → “Configure Runtime Arguments” → check that disable-hardware-acceleration is not set to true. If it is, remove that line and restart.

    3. Tweaking “Smoothness” — Fluid Navigation

    Two settings that cost almost nothing but make VS Code feel premium to use. Add both to your settings.json:

    "editor.cursorSmoothCaretAnimation": "on",
    "editor.smoothScrolling": true

    The smooth caret animation makes the cursor glide between positions instead of jumping it sounds cosmetic but it genuinely reduces the visual jitter that makes editing feel “snappy but rough.” Smooth scrolling on long files is similarly low-cost and high-impact.

    Don’t turn off Quick Suggestions entirely tune them instead. Turning suggestions off globally removes a genuinely useful feature. The better fix is to limit where they fire and add a small delay so they don’t trigger on every single character:

    "editor.quickSuggestions": {
      "other": true,
      "comments": false,
      "strings": false
    },
    "editor.suggestDelay": 10

    This stops suggestions from firing inside comments and strings two places they’re mostly noise while keeping them active in actual code. The 10ms delay is imperceptible to you but enough to prevent suggestions from triggering mid-word.

    4. Workflow Tricks for Speed

    Running two VS Code windows for frontend and backend is costing you roughly 1GB of RAM. Each window is a separate Electron process with its own V8 heap, extension host, and language server instances. Use Multi-root Workspaces instead File → Add Folder to Workspace and keep everything in one process. It’s one of the most impactful RAM reductions you can make without changing a single setting.

    VS Code’s integrated terminal gets significantly slower with heavy ZSH or Fish themes. Powerline fonts, git status decorators, and custom prompts all add execution overhead to every terminal command and inside VS Code’s terminal layer, that overhead compounds. Create a lighter shell profile specifically for the integrated terminal and keep your full-featured theme for your standalone terminal app.

    The Command Palette should be your primary navigation tool, not the mouse. Every time you reach for the mouse to click a menu, you’re breaking your input-to-editor loop. Ctrl+Shift+P for commands, Ctrl+P for files, Ctrl+G for line numbers these three shortcuts handle 90% of navigation. The less your hands leave the keyboard, the tighter and faster your editing rhythm becomes.

    Quick Settings Reference Table

    SettingValueImpact
    editor.inlineSuggest.enabledfalseFixes typing lag and latency
    editor.formatOnSavetrueAutomates cleanup (watch CPU cost)
    editor.bracketPairColorization.enabledtrueBuilt-in now; faster than old extensions
    files.autoSave"onFocusChange"Prevents constant disk I/O while typing
    editor.minimap.enabledfalseReduces GPU rendering overhead
    editor.smoothScrollingtrueFluid navigation on long files
    editor.guides.indentationfalseRemoves expensive vertical line redraws
    editor.suggestDelay10Stops suggestions firing mid-word

    One Pro Tip Worth Pinning

    If you notice lag that gets progressively worse the longer you type in a session, it’s almost certainly a memory leak in a specific extension. This was widely reported with Copilot and Ruff in early 2026 not a VS Code core issue, but an extension host issue. Before you restart the entire app, try Ctrl+Shift+P → “Developer: Reload Window” it restarts the extension host and clears the leak in about two seconds, without losing your open files or editor state.

    It’s faster than a full restart and fixes the problem just as effectively. Add it to muscle memory.